Astrophotography Resort : Your Complete Guide to Capturing the Night Sky at Astroport Sariska
Imagine standing under a canopy of 4,000 stars, your camera ready to capture the glowing arch of the Milky Way stretching across the Rajasthan sky. For travelers escaping the light-polluted corridors of Delhi NCR, finding a true dark sky sanctuary equipped with professional-grade telescopes and expert guidance transforms a simple getaway into an unforgettable cosmic adventure. Welcome to Astroport Sariska, where astrophotography meets wilderness luxury.
Astroport Sariska invites you to rediscover wonder beneath vast star-lit skies and amidst forested hills. As India’s first astronomy-themed resort, we blend wild-forest charm, wildlife proximity and eco-friendly luxury so you can gaze at the cosmos by night and unwind in serene cottages by day. Perfect for families, couples or anyone craving a nature and stargazing escape.
This guide walks you through everything you need to know about capturing stunning night sky photographs during your stay at our astrophotography resort experience. From camera settings to celestial calendars, we share practical tips that work whether you carry a professional DSLR or just your smartphone.
Why Astroport Sariska Is the Ideal Astrophotography Resort Experience
Not all stargazing destinations are created equal. While city outskirts might promise darker skies, they rarely deliver the combination of pristine darkness, professional equipment, and comfortable accommodation that serious astrophotographers need.
Dark Skies Near Sariska Tiger Reserve
Light pollution remains the biggest enemy of astrophotography. Most urban areas fall into Bortle Class 8 or 9, where artificial light drowns out all but the brightest celestial objects. Delhi NCR fits squarely into this category, with barely 20 to 50 stars visible on a clear night.
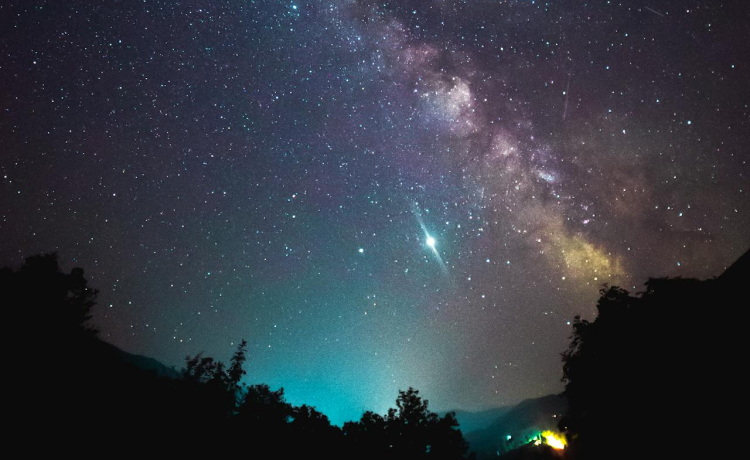
Astroport Sariska operates within a Bortle Class 3 to 4 zone. This rating means you can see over 4,000 stars with your naked eye. The Aravalli hills shield our location from the light domes of nearby cities like Alwar and Jaipur, creating what astronomers call a “dark pocket.” The Milky Way appears structured and obvious, with visible dust lanes and the bright galactic bulge that photographers dream about.
Our location near Tehla Gate of Sariska Tiger Reserve provides a natural buffer. The protected forest acts as a barrier against encroaching development, ensuring our skies remain dark for years to come.
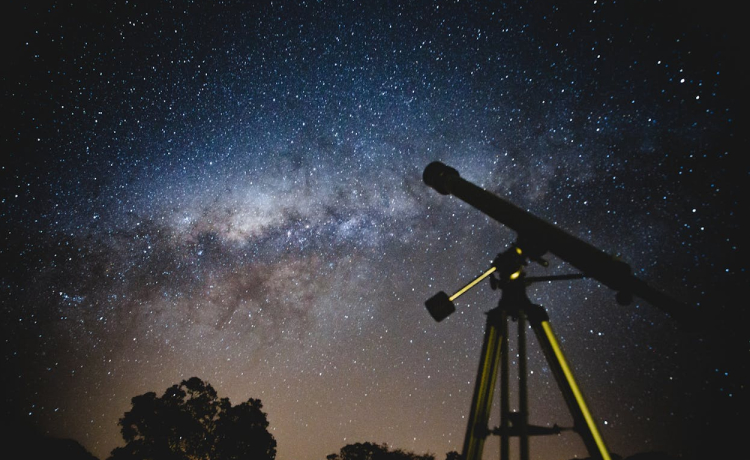
Professional Telescopes and Guided Stargazing
Equipment makes the difference between a blurry photo and a magazine-quality shot. We provide 16-inch Dobsonian telescopes that gather approximately 5,000 times more light than the human eye. These telescopes come equipped with computerized tracking mounts that rotate at the sidereal rate, compensating for Earth’s rotation to prevent star trailing during long exposures.
Our astronomy experts help you adapt your DSLR or mirrorless camera to these telescopes using T-ring adapters. This setup transforms the telescope into a powerful 1200mm-plus lens, perfect for capturing detailed shots of the moon, Jupiter’s moons, or Saturn’s rings. We stock adapters for Canon, Nikon, and Sony systems, and our team assists with the technical challenge of reaching proper focus.
For smartphone users, we offer high-quality adapters like the Celestron NexYZ that attach your phone to telescope eyepieces. Modern smartphones with computational night modes can capture surprisingly detailed lunar surface shots and bright planetary images when stabilized through professional optics.
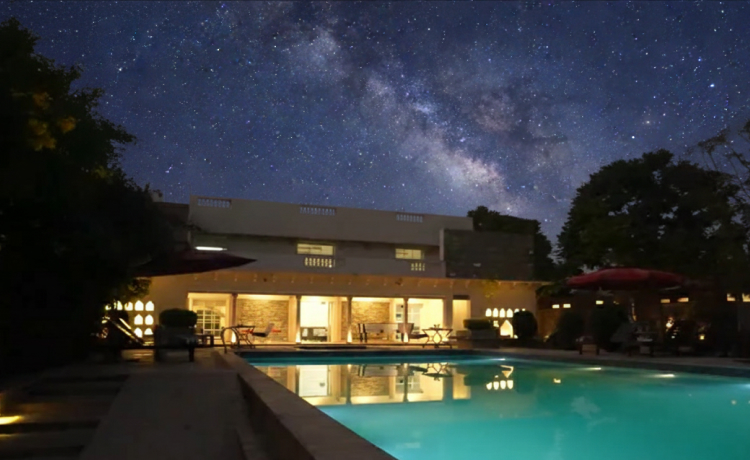
Comfort Meets Cosmos: Stay, Shoot, Relax
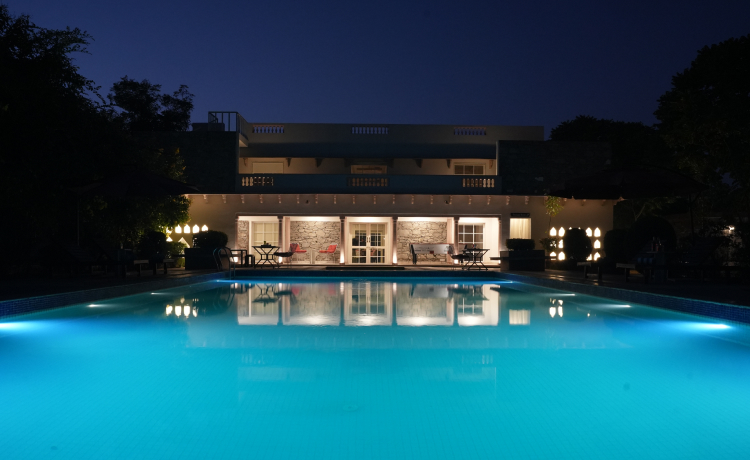
Unlike camping trips where you rough it in the wilderness, our astrophotography resort experience balances adventure with luxury. After a night of shooting stars, retreat to comfortable cottages with modern amenities. Some accommodations feature private pools where you can cool off after a morning tiger safari.
We operate as a 100 percent solar-powered resort, meaning our commitment to dark skies extends beyond just turning off lights. Our eco-conscious approach includes a strict Red-Light Policy after sunset, using only red-filtered illumination that preserves your night vision while you work with your camera. This attention to detail sets us apart from generic stargazing spots.
Quick Facts About Astroport Sariska:
- Bortle Class 3 to 4 dark sky rating
- 16-inch Dobsonian telescopes with tracking mounts
- T-ring adapters for major camera brands
- Smartphone telescope adapters available
- Red-Light Policy to preserve night vision
- 100 percent solar-powered operations
- Located 3 to 4 hours from Delhi NCR
- Near Sariska Tiger Reserve (combine safari with stargazing)
What Is Astrophotography? A Beginner-Friendly Guide
Astrophotography is the art and science of photographing celestial objects and areas of the night sky. While it might sound technical, anyone with a camera and patience can start capturing cosmic beauty.
At its core, astrophotography involves long exposure photography. Unlike daytime shots that capture in fractions of a second, night sky images require your camera sensor to collect light over several seconds or even minutes. This extended exposure gathers enough photons from distant stars and galaxies to create visible images.
The key challenge is that Earth constantly rotates. Without compensation, stars appear as streaks rather than pinpoints. Professional astrophotographers solve this using tracking mounts that move the camera at the same rate as Earth’s rotation. At our resort, we provide these mounts so your photos stay sharp.
Types of Astrophotography You Can Try Here
Milky Way Photography: Wide-field shots that capture our galaxy’s dense central band stretching across the sky. These images often include landscape elements like the Aravalli hills or resort cottages as foreground interest. Best attempted with wide-angle lenses between 14mm and 24mm.
Star Trails: Long exposures lasting minutes or hours that deliberately capture Earth’s rotation, creating circular patterns around the celestial pole. These artistic images work beautifully with architectural elements in the frame.
Moon Photography: Detailed shots of lunar craters, maria (dark plains), and mountain ranges. The moon is bright enough to photograph with relatively short exposures, making it perfect for beginners learning manual focus techniques.
Telescope-Assisted Deep Sky: Using our 16-inch telescopes, you can photograph nebulae, galaxies, and star clusters that are invisible to the naked eye. This advanced technique requires patience but produces stunning results.
Q: Do I need expensive equipment for astrophotography?
A: No. While professional gear helps, we’ve seen beautiful results from smartphones using night mode and basic tripods. Our guided sessions help you maximize whatever equipment you bring.
Best Time for Astrophotography at an Astrophotography Resort Location
Timing determines whether you capture a masterpiece or return home disappointed. Three factors matter most: season, moon phase, and time of night.
Best Months for Clear Skies
Rajasthan’s post-monsoon and winter months offer the most reliable clear weather. October through March provides low humidity and stable atmospheric conditions that are ideal for night sky photography.
During these months, the dry desert air creates excellent “seeing” (astronomical term for atmospheric stability). Stars appear crisp rather than twinkling excessively, which prevents blur in long exposures. The comfortable nighttime temperatures between 10 to 20 degrees Celsius let you spend hours outdoors without discomfort.
Avoid the monsoon months of July through September when cloud cover dominates. While occasional clear nights do occur, the unpredictability makes planning difficult.
Why New Moon Nights Matter
The moon’s brightness can overpower faint stars and wash out the Milky Way. New moon periods provide the darkest skies for photography.
New moon occurs when the moon sits between Earth and the sun, keeping its illuminated side facing away from us. During these nights, the sky remains dark from sunset to sunrise, maximizing your shooting window.
For 2026, prime new moon windows at Astroport Sariska include:
- March 14 to March 24 (spring Milky Way rising)
- May 12 to May 19 (peak Milky Way season)
- September 10 to September 18 (autumn closing window)
Book your stay around these dates for optimal astrophotography conditions. Our team monitors the lunar calendar year-round and can suggest the best upcoming windows when you call.
Ideal Time of Night for Shooting
The Milky Way’s galactic core becomes visible in the southeastern sky after 10 PM during spring and summer months. By midnight, it reaches its highest point overhead, offering the most dramatic composition opportunities.
Plan to start setup around 9 PM, giving your eyes 30 to 45 minutes to adapt to darkness. This rhodopsin build-up in your retinas is crucial for seeing faint deep-sky objects and for safely navigating your equipment in low light.
The hours between 11 PM and 2 AM typically provide the calmest atmospheric conditions. Wind dies down, and temperature inversions stabilize the air, reducing the “twinkling” that can blur long exposures.
Q: When can I see the Milky Way at Astroport Sariska?
A: The Milky Way galactic core is visible from late February through October. Peak viewing runs May through August when it appears highest in the sky after midnight.
Equipment You Need for Astrophotography at Astroport Sariska
Fear of needing expensive gear stops many beginners from trying astrophotography. The truth is that you can start with minimal equipment and upgrade as your skills develop.
DSLR or Mirrorless Setup (Ideal)
A camera with manual controls gives you the most flexibility. Entry-level DSLRs or mirrorless cameras from Canon, Nikon, or Sony work perfectly well. Look for these features:
Full Manual Mode: You need complete control over ISO, aperture, and shutter speed. Auto modes cannot handle low-light conditions properly.
Bulb or Time Mode: For exposures longer than 30 seconds, bulb mode lets you keep the shutter open as long as needed. On our tracking mounts, you might expose for several minutes.
High ISO Performance: Modern cameras handle ISO 3200 to 6400 with acceptable noise levels. This sensitivity captures faint starlight that the eye cannot see.
Wide-Angle Lens: A 14mm to 24mm lens with a wide aperture (f/2.8 or wider) captures sweeping Milky Way vistas. Kit lenses that only open to f/4 or f/5.6 require longer exposures and higher ISO, reducing image quality.
Smartphone Setup (Yes, It’s Possible)
Recent smartphones from Apple, Samsung, and Google include dedicated night modes that stack multiple exposures automatically. While you cannot match DSLR quality, you can absolutely capture recognizable star fields and the Milky Way.
Use a Tripod: Even the steadiest hands cannot hold a phone still for 15 to 30 second exposures. Bring a small smartphone tripod or use one of ours.
Enable Night Mode: This computational photography feature takes multiple short exposures and combines them to reduce noise while maintaining detail.
Manual Camera Apps: Apps like NightCap or DeepSkyCamera unlock manual controls on phones, letting you set ISO and exposure length precisely. These apps significantly improve astrophotography results compared to default camera apps.
Disable Flash and HDR: Both features interfere with long exposures. Turn them off in your camera settings.
Extra Tools Available at Our Astrophotography Resort
You do not need to pack everything. We provide:
Sturdy Tripods: Essential for any long exposure work. Our collection includes heavy-duty models that resist wind vibration.
Red-Light Headlamps: Preserve your night vision while adjusting camera settings. White light causes your pupils to contract, ruining 30 minutes of dark adaptation in seconds.
Dew Heaters: Rajasthan’s cool nights can cause moisture to condense on camera lenses. Our dew prevention strips wrap around lenses, keeping optics clear.
Intervalometers: These remote triggers let you shoot series of photos without touching the camera, eliminating vibration from pressing the shutter button.
Power Banks: Cold nights drain camera batteries faster than normal. Keep spares charged and warm in your pocket.
Come for the forest. Stay for the stars. Book your astrophotography getaway and let our team guide you through your first night sky captures.
Step-by-Step: How to Capture the Milky Way at an Astrophotography Resort
Breaking down the process into clear steps removes the mystery from astrophotography. Follow this workflow during your stay for the best results.
Step 1: Find the Darkest Spot in the Resort
Not all locations offer equal darkness. Our team will guide you to designated photography zones away from even our red security lighting. The open lawn near the telescope dome provides 360-degree sky views, perfect for wide-field Milky Way panoramas.
Position yourself so the galactic core rises above the Aravalli hills on the southeastern horizon. This creates natural foreground interest, adding depth and scale to your composition.
Step 2: Use Manual Mode Settings
Switch your camera to full manual (M mode). Start with these baseline settings, then adjust based on results:
ISO: 3200 to 6400 (higher values capture more light but add noise)
Aperture: f/2.8 or wider (larger opening gathers more light)
Shutter Speed: 15 to 25 seconds (longer creates star trails; use the Rule of 500)
The Rule of 500 helps prevent star trailing on non-tracking mounts. Divide 500 by your lens focal length multiplied by crop factor. For a 14mm lens on a full-frame sensor, 500 divided by 14 equals approximately 35 seconds maximum exposure. However, 20 to 25 seconds often produces sharper results.
Step 3: Focus on a Bright Star
Autofocus fails in darkness. Manual focusing requires a different technique:
Point your lens at a bright star like Sirius or Vega. Zoom in on your camera’s LCD screen using the digital magnification feature (usually a plus button). Slowly turn the focus ring until the star appears as the smallest possible pinpoint, not a blurry disk.
Once sharp focus is achieved, secure the focus ring with a small piece of tape. Accidental bumps during the night can shift focus, ruining subsequent shots.
Step 4: Frame with Aravalli Silhouettes
Including landscape elements transforms a simple star photo into a compelling image. The jagged ridgeline of the Aravalli hills, the silhouette of a resort cottage, or a telescope dome adds context and visual interest.
Use the rule of thirds. Position the horizon in the lower third of your frame, leaving two-thirds for the sky. This composition draws the viewer’s eye to the stars while grounding the image with recognizable earthly features.
Step 5: Take Multiple Shots and Adjust
Your first exposure rarely delivers perfect results. Review the image on your LCD screen (turn brightness down to avoid blinding yourself). Check the histogram rather than trusting your eyes in the dark.
A dark image simply needs a higher ISO or a longer shutter speed. Stars showing motion blur are a sign to pull back your exposure time. A washed-out Milky Way usually points to one of two culprits: a moon phase that is too bright, or unexpected light pollution creeping in from a nearby direction.
Capture 10 to 20 frames of the same composition. Later, these can be stacked using software like DeepSkyStacker to reduce noise and enhance faint details invisible in single exposures.
Q: What camera settings work best for beginners?
A: Start with ISO 3200, f/2.8 aperture, and 20-second exposure. Adjust from there based on your first test shot. Our guides help you dial in perfect settings.
Creative Astrophotography Ideas Unique to Astroport Sariska
Beyond standard Milky Way shots, our location offers unique creative opportunities that combine astronomy with the natural setting.
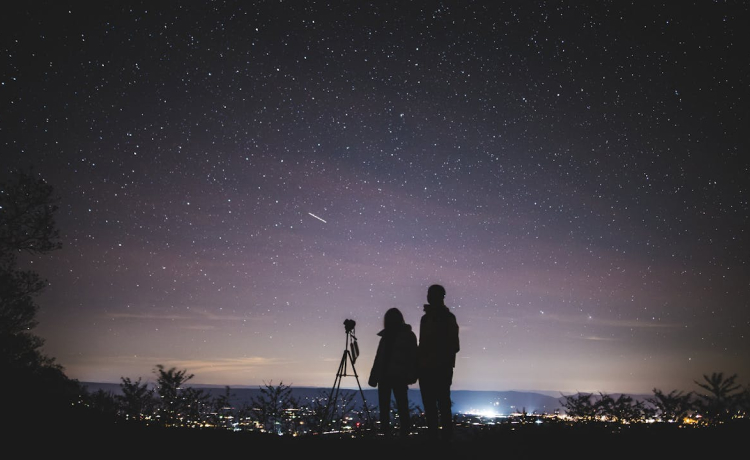
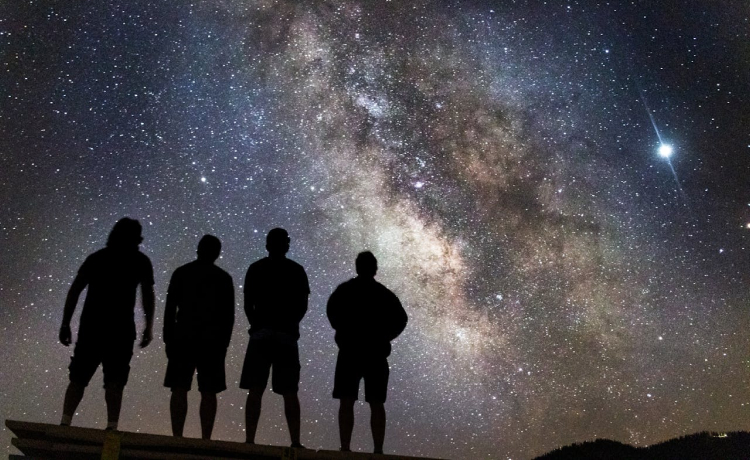
Couple Silhouettes Under the Stars
Romantic compositions feature two people gazing upward, backlit by the Milky Way. Use a low-power red headlamp to faintly illuminate faces during the long exposure, creating a dreamy effect without overpowering the stars.
Time your shot during twilight when a hint of blue remains on the horizon. This “blue hour” color gradient provides depth and prevents the silhouettes from appearing as pure black cutouts.
Star Trails Above the Cottages
Transform your accommodation into art. Set up your camera pointed at a cottage with the northern sky above. Use 30-second exposures repeated for one to two hours (an intervalometer automates this).
Combine the images in post-processing to create circular star trails around Polaris, the north star. The cottage provides a static reference point, emphasizing the Earth’s rotation.
Wildlife and Night Sky Mood Shots
Our proximity to Sariska Tiger Reserve creates rare opportunities. While photographing actual wildlife at night requires infrared equipment and permits, you can capture evocative scenes at twilight when the forest silhouette frames the emerging stars.
Morning safaris that start before dawn offer chances to photograph the Milky Way setting over the jungle canopy, with the possibility of capturing bird silhouettes as they wake.
Telescope Shot Photography
Attach your camera to our 16-inch Dobsonian to photograph deep-sky objects. The Orion Nebula, Andromeda Galaxy, and star clusters like the Pleiades become accessible targets. This technique, called prime focus photography, turns the telescope into an extremely powerful telephoto lens.
Our team assists with precise polar alignment and focusing, two critical technical steps that make or break telescope astrophotography. The computerized tracking system keeps objects centered in your frame for exposures lasting several minutes.
Safety and Comfort Tips for Night Photography Near Sariska
Understanding basic safety protocols ensures you enjoy your astrophotography adventure without worry.
Our resort maintains defined photography zones within secure boundaries. While Sariska Tiger Reserve hosts leopards and other wildlife, our fencing and night watch team keep animals at a safe distance. You will photograph under supervision, never wandering into unprotected forest areas.
The Red-Light Policy applies resort-wide after 9 PM. All pathways use red-filtered LEDs that provide enough illumination for safe walking while preserving the dark sky. Bring your own red headlamp for equipment work, or borrow one from our collection.
Temperatures can drop to 10 degrees Celsius during winter nights. Dress in layers, including a warm jacket, as you will stand relatively still for hours. Our cottages remain heated, so you can take warm-up breaks between shooting sessions.
Inform our front desk about your photography plans. Our team monitors weather conditions and can advise if unexpected clouds roll in, saving you a wasted setup effort. They also coordinate with safari guides to ensure no vehicle headlights interfere with your exposures.
Stay hydrated and bring snacks. Photography sessions often extend past midnight, and you will appreciate having energy without needing to walk back to the dining area.
Q: Is it safe to photograph at night near a tiger reserve?
A: Yes. All stargazing and photography happen within our secured resort premises with staff supervision. You enjoy dark skies without wildlife risk.
Why Stay at an Astrophotography Resort Instead of Doing It Alone
You might wonder whether you need a specialized resort when dark sky locations exist throughout rural Rajasthan. Several factors make the guided experience worth the investment.
Light Pollution is Deceptive: What appears dark to the naked eye often registers significant skyglow on camera sensors. Even areas that seem remote can suffer from distant city domes. Astroport Sariska’s Bortle Class 3 to 4 rating is verified and consistent, unlike random roadside stops.
Equipment and Expertise: Professional tracking mounts cost thousands of dollars and require technical knowledge to set up correctly. Our telescopes and guided assistance give you access to hardware you might not own, plus the expertise to use it effectively.
Safety and Comfort: Camping in wilderness areas near Sariska carries genuine risk from wildlife and limited emergency services. Our resort balances adventure with security, professional medical backup, and comfortable beds for recovery after late nights.
Integrated Experience: We combine astrophotography with morning tiger safaris, nature walks, and farm-to-table dining. Your weekend becomes a holistic retreat rather than just a photography trip.
Weather Backup: Cloudy nights happen. Unlike a solo trip where bad weather wastes your time, we offer indoor planetarium sessions, telescope-making workshops, and astronomy lectures when clouds obscure the stars.
The difference between a random dark field and a dedicated astrophotography resort experience is like the difference between cooking over a campfire and dining at a fine restaurant. Both involve food, but the quality and enjoyment differ dramatically.
Plan Your Astrophotography Getaway Near Delhi NCR
Astroport Sariska sits approximately 200 kilometers from Delhi, translating to a comfortable 3 to 4 hour drive depending on traffic. From Gurgaon, take NH 48 toward Jaipur, then branch toward Alwar. Well-marked roads lead to Tehla village and our resort entrance.
The ideal visit spans two nights and three days. This duration gives you two shooting opportunities in case weather affects one night, plus time to enjoy a morning safari and daytime astronomy activities.
Sample Itinerary:
Day 1 (Afternoon/Evening): Arrive by 4 PM. Settle into your cottage. Attend the 5 PM orientation covering telescope basics and night sky highlights. Enjoy dinner from our organic farm produce. Begin stargazing around 9 PM with guided Milky Way photography session.
Day 2 (Full Day): Early morning safari in Sariska Tiger Reserve (6 AM to 9 AM). Return for breakfast. Relax by the pool or participate in the telescope-making workshop. Afternoon nap to recover from late-night photography. Second evening session focusing on deep-sky telescope photography and creative compositions.
Day 3 (Morning): Optional sunrise astrophotography (Milky Way setting in the west). Breakfast and checkout by 11 AM, or extend your stay to continue exploring.
Weekend packages include accommodation, meals, telescope access, and guided sessions. Couples particularly enjoy the private cottage options with pool access, combining honeymoon-style romance with cosmic adventure.
Book during new moon phases for the darkest skies. Check our website calendar or call to confirm optimal dates for your visit. Early booking during peak season (October to March) is recommended as photography slots fill quickly.
Book your astrophotography resort experience and transform your weekend into a journey through space and time.
FAQs About Astrophotography at Astroport Sariska
Q: Can beginners try astrophotography at Astroport Sariska?
A: Absolutely. Our guided sessions are designed for first-time photographers. We teach you manual camera settings, focusing techniques, and composition. You do not need prior experience.
Q: What is the best time for astrophotography in Rajasthan?
A: October through March offers the clearest skies and comfortable temperatures. New moon nights provide the darkest conditions. The Milky Way galactic core is visible from late February through October.
Q: Do I need a DSLR camera for astrophotography?
A: A DSLR or mirrorless camera provides the best results, but modern smartphones with night mode can capture impressive star photos when used with a tripod and our telescope adapters.
Q: Is it safe to do night photography near Sariska Tiger Reserve?
A: Yes. All photography activities occur within our secure resort boundaries with staff present. You photograph in designated safe zones, never in unprotected wilderness.
Q: Can I see the Milky Way at this astrophotography resort location?
A: Yes. During clear, moonless nights from March through October, the Milky Way appears prominently overhead. Our Bortle Class 3 to 4 skies reveal structure invisible from cities.
Q: How far is Astroport Sariska from Delhi NCR?
A: The resort is approximately 200 kilometers from Delhi, a 3 to 4 hour drive via NH 48. We are easily accessible for weekend getaways.
Q: Do you provide telescopes and equipment for photography?
A: Yes. We supply 16-inch Dobsonian telescopes with computerized tracking mounts, camera adapters for major brands, tripods, and guidance. You can photograph through our telescopes using your own camera.
Capture Your Cosmic Moment
The universe waits for no one, but the stars will always return. Whether you dream of photographing the Milky Way arching over ancient hills, capturing Jupiter’s moons through professional optics, or simply experiencing the profound silence of a truly dark sky, Astroport Sariska offers the perfect setting.
Our unique blend of astronomical expertise, wildlife proximity, and eco-conscious luxury creates an astrophotography resort experience found nowhere else. Just 3 to 4 hours from Delhi, you can trade light pollution for starlight, guided by experts who make the technical simple and the cosmic accessible.
Book your stay at Astroport Sariska and discover what 4,000 stars can teach you about wonder, patience, and the art of capturing light that traveled millions of years to meet your camera sensor.